Saturday, December 28, 2013

Collages

Hey guys,
Sorry we haven't been posting in a while, but don't worry we've decided from now on we will post on a more regular basis! With that being said, today we want to share with you our most recent project. A wall collage! Who doesn't love collages?! I mean, they are perfect because your favorite pictures can be used, its a great way to jazz up an empty wall, and can be made into any size or shape! Oh and might I mention its quite easy and can be super fun making with the best friend!

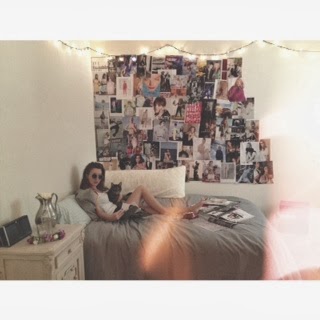
Heres how ours turned out

Now heres what you'll need..
-images, and lots of them
-scissors 
-tape
-and probably your best friend for help!

What to do? Oh its easy...
Simply pick out a bunch of your most favorite pictures. If they are from magazines, cut them out. Online, print them! Once you've collected almost an unlimited supply of pictures your ready for taping.
Arrange them to how you like them, then start taping. Depends on what look your going for, but I'd suggest taping them together on the back so the tape isn't shown. Then with he help of someone, cuz trust me it is impossible to do by yourself, tape the big collage to your wall. It will take a lot of tape to stay, believe me, but its okay, the more the merrier. And there you have it! Your own personalized collage and now that ugly white wall is now full of color and design. 

Hope you guys enjoyed this and try it our yourself!
xoxo, gracie and lili

Saturday, August 17, 2013

New Video!

Hey Guys. Im sorry we haven't posted in a long time, but today we have a new video for you. It's a Brandy Melville inspired video to the song called, "Eyes on Fire." We hope you enjoy:) 


Thursday, June 20, 2013

Coconut Chocolate Chip Cookies


           Today on our blog is a delicious dessert. A coconut chocolate chip cookie. This recipe is from another blog, "What's Gaby Cooking." Click the link below for the recipe.

http://whatsgabycooking.com/coconut-chocolate-chip-cookies/#.UcODw-COrDU


This is a great recipe. Super easy and so yummy! Below are some pictures
Enjoy and happy baking!


Saturday, April 27, 2013

Homemade Doughnuts

Today Gracie and I made doughnuts from scratch. They turned out amazing and we thought we would share them with you. Now, making doughnuts does take awhile but don't let that scare you away. It is actually quite easy. We found the recipe in a book called, "Doughnuts" by Lara Ferroni. She has a bunch of other unique flavors that I am eager to try! You should definitely check out her book here for the recipe. Or there are some great ones online such as this.  

Heres how ours came out...


Wednesday, April 24, 2013

Crêpes Suzette

A few days ago, I made Crêpes Suzette. I will warn you it is not easy. Now I am not saying you shouldn't try it, but it is not a dessert you can whip up in five minutes (unless of course you're Emeril Lagasse). I found the recipe for the sauce in a book called The Food of France. 

To make the crêpes...

You can use any crêpe recipe you want, I used one from a cookbook, but you can find it on the internet it really doesn't matter. Once you have made the batter, before you cook the crêpes, stir in about 2 tablespoons of orange zest, and 1 tablespoon of lemon zest. Once that is done, continue to follow whatever recipe you are using and cook the crêpes as directed. Once the crepes are done, fold them in quarters.


To make the sauce...

What you will need:

-1/2 cup superfine sugar

-1 cup orange juice

-1 tablespoon orange zest
-2 tablespoons brandy

-2 tablespoons Grand Manier

- 1/2 cup unsalted butter

Melt sugar in a large frying pan by tilting the pan to melt the sugar into carmel. Then pour in the orange juice and zest and boil for 2 minutes.


Then add the folded crêpes to the sauce and spoon the sauce over them. Then add the brandy and Grand Manier (don't worry all of the alcohol burns off;) and flambé by lighting the pan with a gas flame or a match (stand back while doing this and keep a damp kitchen towel handy incase of emergency). Add the butter and serve when it is melted. 


Enjoy! 


Sunday, April 14, 2013

Blackened Salmon with Rice

Today on the blog I thought I give you all the recipe I made for dinner which turned out delish! It is a seasoned salmon fillet with white rice, and simple salad. This is a great recipe for kids and adults, and my favorite part is how healthy it is!

Ingredients include

2 cups of instant rice
2 1/2 TBS paprika
3/4 tsp cayenne pepper
1 tsp dried thyme
1/2 tsp garlic powder
4 6-ounce salon fillets, skinned
1 lemon
green onions
baby arugula
tomatoes
salt and pepper to taste

1. Preheat the oven to 400 degrees. Cook the rice according to the package directions.

2. Meanwhile, combine the paprika, cayenne, thyme, garlic powder, and some salt.

3. Generously coat all sides of the salmon fillet

4. Heat a large ovenproof skillet over medium-heat. Cook the salmon until blackened, 2 minutes per side. Transfer to the oven for about 6 minutes.

5. Lastly, toss together the arugula, tomates and green onions. Add olive oil, lemon juice, salt and pepper.

6. Finally, plate your salmon on top of the salad and rice on the side. Top your salmon with squirts of lemon juice.

This is great recipe that takes only 20 minutes at most! Enjoy the Blackend Salmon!
xoxo. Gracie


Saturday, March 9, 2013

Coca-Cola Pics

This weekend we got an old fashioned coca-cola bottle, put some daisies in our hair, and had a photoshoot. It was really fun, and any one can do it! I've attached some of the pictures that we took. 


Tip** Take pictures in the late afternoon before sunset, when the sun is lower in the sky, and you can get the cool affect of backlighting. 


Have a great week:)
   

Thursday, March 7, 2013

Warm Gooey Peanut Butter Cookies

On the blog today is an easy yet delish peanut butter cookie! Simple easy little morsel to eat as a snack once in a while. They keep fresh great if sealed properly. To start here's the recipe.

1/2 cup sugar
1/2 cup packed brown sugar
1/2 cup butter, room temp.
1/2 cup peanut butter
1 egg
1 1/4 cup flour
3/4 tsp. baking soda
1/2 tsp. baking powder
1/4 tsp. salt

Beat the butter until creamy, 2 minutes. Add the sugars, beat for 2 more minutes. Mix in the peanut butter and egg. Mix together dry ingredients- flour, baking soda, baking powder, and salt. Stir the dry ingredients into the sugar butter mixture.

Preheat oven to 300 degrees F. Shape dough into 1 1/4 inch balls. Place about 3 inches apart on ungreased cookie sheet. Flatten in crisscross pattern with a fork. Bake until light brown, 15 minutes. Cool for a few minutes, and dig in to a delectable warm cookie.

Hand these out to your friends, bring them to family, or simply eat them all for yourselves! These are great cookies for any of these choices. Guaranteed to please!
Finished Product!

Wednesday, January 30, 2013

Banana Bread

  Ever since my Nana started making banana bread, I have become addicted. Not only is it delicious, but it also a healthier alternative for other baked goods. Unlike cake, I never feel bad after I eat it because it's somewhat healthy. I mean, there are bananas in it...that counts. 
  Anyway, on to the recipe. 

- 3-4 Ripe Bananas

- 1 Cup of Sugar

- 1 1/2 Cups of Flour 

- 1/4 Cup Melted Butter

- 1/2 Teaspoon of Salt

- 1 Teaspoon of Baking Soda

- 1 Egg

- 1/2 Cup of Sour Cream or Applesauce 

- Chocolate chips, walnuts, etc. (however many you want)

I know what you are thinking; "Sour cream, applesauce?" Yes! If you don't already know, both of these ingredients will make the bread more moist.

  Preheat your oven to 350°F. In a bowl, mash bananas with a fork. Add the remaining ingredients. Pour mixture into a buttered (9x5) loaf pan and bake for an hour. When it is finished baking, let it cool, remove it from the pan, and enjoy! 

Fresh out of the oven!


Monday, January 28, 2013

The New and Improved Shirley Temple

           One of my personal favorite drinks is a shirley temple! I'm always craving one, but I'm not going to go out and buy grenadine full of sugar! So I learned a new trick on how to make a Shirley temple! My camp counselor actually taught this to me!

Ingredients:
Sprit, Ginger Ale, Mountain Dew, or 7-UP will work for this drink
Red Raspberry Tea Bags
And Glass of Ice

         Pour your soda in the glass of ice and add one tea bag, wait for it to brew, about 2 minutes and your done! (Tip** the longer it brews the stronger the raspberry flavor) It's as easy as that, and the best part is that it is a lot more healthy for you! But dont get me wrong, soda does have a lot of sugar but everyone once in a while this drink does the job. For mine I used ginger ale which I think is the best. Happy Brewing!


Wednesday, January 23, 2013

The Polaroid Camera

   The polaroid  camera was invented in 1948. Today most people use digital cameras for photography, but polaroid cameras are making a comeback. When you take a picture with a polaroid, you don't know how the picture will look when it is developed. People may argue that that is a bad thing, but I personally think thats the fun in it.  The pictures may not come out looking perfect, but they always appear old fashioned and creative.

   If you are into photography, or just like playing around with the camera, try using a polaroid sometime. You may be surprised at how cool your pictures turn out. Have fun and get creative! 
Recently Gracie and I did I polaroid photo shoot with cotton candy. Below are just several of the many pictures we took! 

Tuesday, January 22, 2013

Quinoa Chicken Salad

      On the blog today is personally one of my favorites! A quinoa chicken salad. It is a very healthy yet hardy option. I hate it when I try to be healthy, so I have a salad, and it never fills me up! So hopefully this will fill you up!

Here's the recipe:

-1 cup quinoa
-3/4 cup diced chicken
- 4 Tbs chopped red onion
- 1 cup cherry tomatoes
- 3 Tbs basil
-3/4 cup your choice of cheese (goat, feta, or mozzarella)
- 1/2 cup diced avocado

Dressing:
-2 Tbs lemon juice
- 6 Tbs olive oil
-salt and pepper to taste

So those are the ingredients, but feel free to personalize it to your own likings!

Directions:
To begin this recipe start by following the directions on the quinoa. It is a 1:2 ratio, so I used 1 cup of quinoa with 2 cups of water. While the quinoa is cooking, I like to get started on the dressing. Mix all the ingredients together! Its as simple as that! You can also start measuring out all the other ingredients and setting them aside. Once quinoa is done, mix in the dressing and let it cool. Once cooled add the rest on the ingredients, mix it all together then your done!

Quinoa Chicken Salad

Monday, January 21, 2013

About Us

A little more about us. This blog is created by Lili and Gracie. We are two girls putting our hard work out for the world to see. Our everyday lives include things from snapping a shot of our friends, making birthday cakes, and designing jewelry to wear out. We love to show our personality through whatever we make. Explore and Enjoy this blog!


Our Blog

Cook. Capture. Create is a blog designed specifically for interests including cooking, photography, and fashion.